How To Remove Carpet Glue
When it’s time to install new flooring, removing old carpet glue can be a daunting task. However, with the right techniques and tools, the process can be done efficiently.
We understand the importance of properly removing carpet adhesive to ensure a smooth installation of new floors. In this guide, we will walk you through the steps to achieve a clean and fresh start for your floors.
Our goal is to make this process as straightforward as possible, providing you with the necessary information to tackle the task with confidence.
Understanding Carpet Glue and Necessary Preparation
Before diving into the removal process, it’s essential to understand the type of carpet glue you’re dealing with. Carpet adhesives vary in composition, and knowing what you’re up against can make the removal process much smoother.
Types of Carpet Adhesives You Might Encounter
Carpet adhesives can be broadly categorized into epoxy, acrylic, and polyurethane-based adhesives. Epoxy adhesives are known for their strong bonding properties, while acrylic adhesives are generally easier to remove. Polyurethane-based adhesives offer flexibility and are often used in areas with high foot traffic.
Essential Tools and Materials for Removal
To remove carpet glue effectively, you’ll need the right tools and materials. These may include a heat gun or iron for softening the adhesive, a scraper or putty knife for removing the glue, and adhesive removers or solvents to break down the adhesive.
Safety Precautions Before Starting
Before starting the removal process, ensure you’re wearing protective gear, including gloves and goggles. Good ventilation is also crucial, especially when using chemical-based adhesive removers. Taking these precautions can help prevent accidents and ensure a safe removal process.
| Safety Gear | Purpose |
|---|---|
| Gloves | Protect hands from chemicals and sharp objects |
| Goggles | Protect eyes from chemical splashes and debris |
| Ventilation | Prevent inhalation of fumes from adhesive removers |
How To Remove Carpet Glue: Step-by-Step Methods
Tackling the challenge of removing carpet glue can be simplified by understanding the various removal methods available. Removing old carpet glue requires patience, the right tools, and a bit of know-how. Here, we will explore the different techniques to help you achieve a clean and glue-free floor.
Heat Method: Using a Heat Gun or Iron
The heat method involves applying heat to soften the carpet glue, making it easier to remove. This technique is effective for certain types of adhesives.
Application Process
To apply the heat method, start by setting your heat gun or iron to a low to medium heat setting. Hold the heat gun a few inches away from the glue or place the iron on a cloth over the glue to avoid direct contact. As the glue softens, use a scraper to gently pry it off.
Clean-up Steps
After removing the glue, clean the area with a damp cloth to remove any residue. Ensure the floor is dry before applying any new flooring.
Solvent Method: Commercial Adhesive Removers
For more stubborn adhesives, commercial adhesive removers can be highly effective. These products are specifically designed to dissolve and break down the glue.
Product Selection and Application
Choose a remover that is suitable for your floor type. Follow the manufacturer’s instructions for application and take necessary safety precautions.
Working Safely with Chemical Solvents
When using chemical solvents, ensure good ventilation, wear protective gloves, and avoid skin contact. Always follow the product’s safety guidelines.
Natural Solutions: Vinegar and Citrus-Based Removers
For those looking for eco-friendly alternatives, vinegar and citrus-based removers can be effective. Vinegar’s acidity helps break down the adhesive, while citrus-based products offer a non-toxic solution.
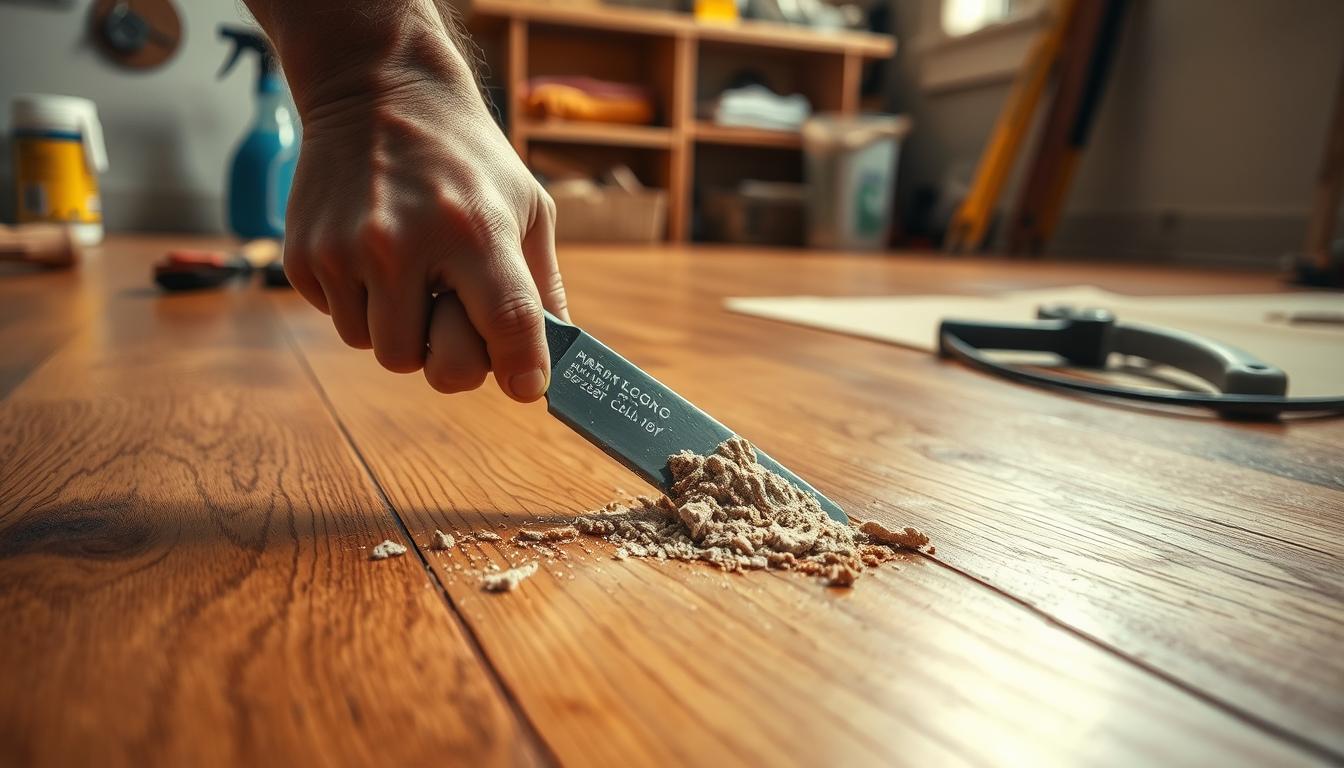
Mechanical Removal: Scraping and Sanding
Mechanical removal involves physically scraping or sanding the glue off the floor. This method is particularly useful for large areas or very stubborn adhesives.
Here’s a comparison of the different methods:
| Method | Effectiveness | Safety Precautions |
|---|---|---|
| Heat Method | High for certain adhesives | Caution with heat, avoid burns |
| Solvent Method | High for most adhesives | Use protective gear, ensure ventilation |
| Natural Solutions | Moderate | Generally safe, but test first |
| Mechanical Removal | High, but labor-intensive | Wear protective gear, avoid inhaling dust |

Specific Techniques for Different Floor Types
Different floor types require tailored approaches for effective carpet glue removal, ensuring the underlying surface remains undamaged. The technique used for concrete floors, for instance, may not be suitable for wooden or tile floors.
Removing Carpet Glue from Concrete
For concrete floors, more aggressive methods can be employed, such as using a scraper or a floor grinder to remove the glue. Commercial adhesive removers designed for concrete can also be effective.
Techniques for Wooden Floors
When dealing with wooden floors, gentler techniques are necessary to avoid damaging the wood. Natural removers or careful sanding can be used to remove the glue without causing harm to the floor.
Solutions for Tile and Other Surfaces
For tile and other surfaces, it’s essential to choose a removal method that won’t damage the underlying material. Specialized adhesive removers or careful scraping can be effective techniques.
| Floor Type | Recommended Removal Method | Precautions |
|---|---|---|
| Concrete | Scraping or using commercial adhesive removers | Wear protective gear, ensure good ventilation |
| Wooden | Natural removers or careful sanding | Avoid using harsh chemicals or excessive force |
| Tile | Specialized adhesive removers or careful scraping | Test a small area first to avoid damaging the tile |
Finishing Touches and Floor Preparation
Now that you’ve removed the carpet glue, it’s time to prepare your floor for new flooring. We start by thoroughly cleaning the floor to remove any remaining residue. This ensures a strong bond between the old floor and the new flooring.
Depending on the type of new flooring you’re installing, you may need to apply a primer or underlayment. For instance, if you’re laying down hardwood or laminate flooring, a moisture barrier can be essential. We recommend checking the manufacturer’s instructions for specific requirements.
It’s also crucial to ensure the floor is level and dry. Any unevenness or dampness can lead to problems with the new flooring. We suggest using a self-leveling compound if necessary and allowing the floor to dry completely before proceeding.
By following these steps, you’ll be able to achieve a smooth, professional-looking finish. Your newly renovated floor will be ready for the next stage, whether that’s installing new flooring or simply enjoying the refreshed space.